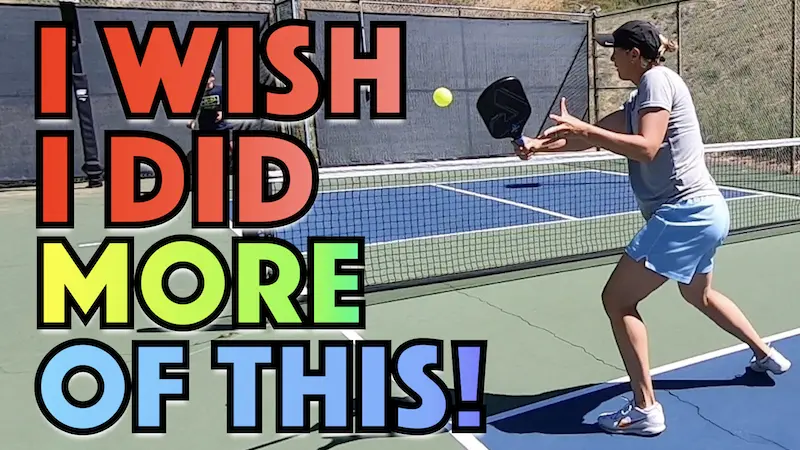
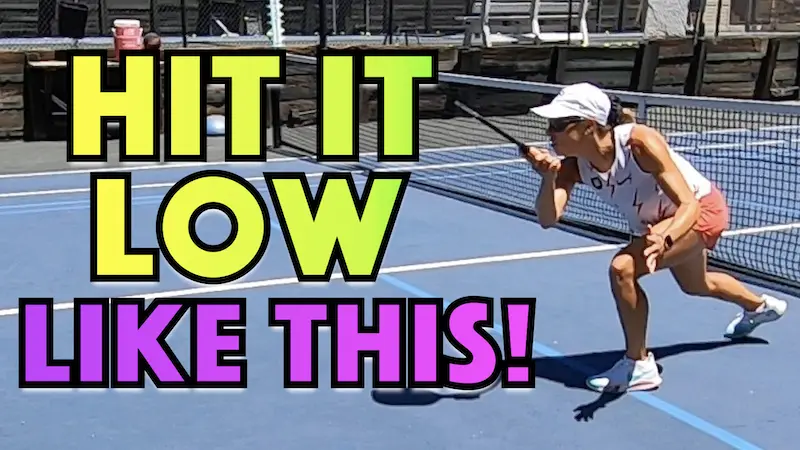
A slice return is a great option on the backhand side because it allows you to do a few things that are beneficial for you towards advancing in the point from there.
Benefit #1
You can cover some ground as you hit the shot which helps you transition to the non-volley zone line faster.
Benefit #2
You can hit it deep and slow which also gives you additional time to get up to the non-volley zone all while putting pressure on them due to the depth.
I’m going to cover seven simple steps to hitting a great backhand slice return.
Step #1 – Split Step
First and foremost you must always remember to split step.
Your split step should roughly coincides with the time your opponent contacts the ball (generally just slightly after they make contact).
That way, by the time your feet make contact with the court again you’re aware of where you need to move.
Even if the shot comes directly towards you, it’s important to always perform the split step because you just never know what direction the ball is going to go.
You want to get there in time and be well positioned when you get there to strike the shot and the split step will always help you with that.
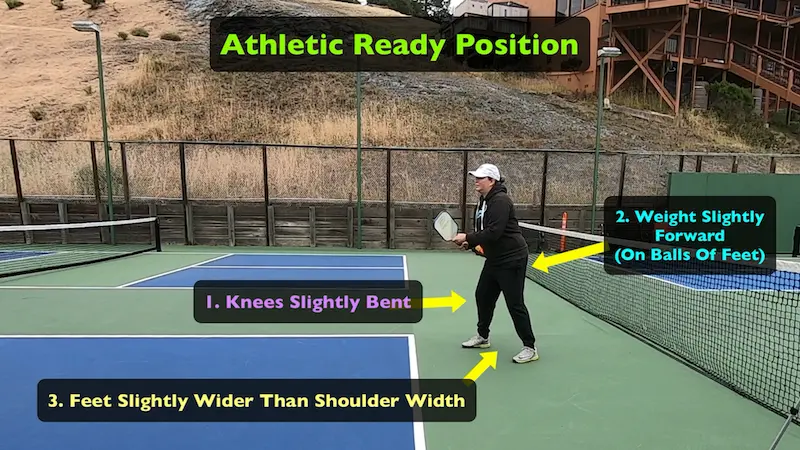
A solid split step combined with an athletic ready position with your paddle at the ready as well is crucial for any successful shot, regardless of the distance you need to move.
If you’ve been tuning in to PrimeTime videos for some time, you’ll notice that we emphasize the importance of the split step repeatedly.
It is a fundamental aspect that cannot be overlooked.
Not executing the split step is one of the top mistakes we often see in recreational level play. So, please be sure that you’re hitting your splits.
Step #2 – Hand Positions
Now let’s look at how to use your hands for the shot.
To execute this shot a continental grip is best.
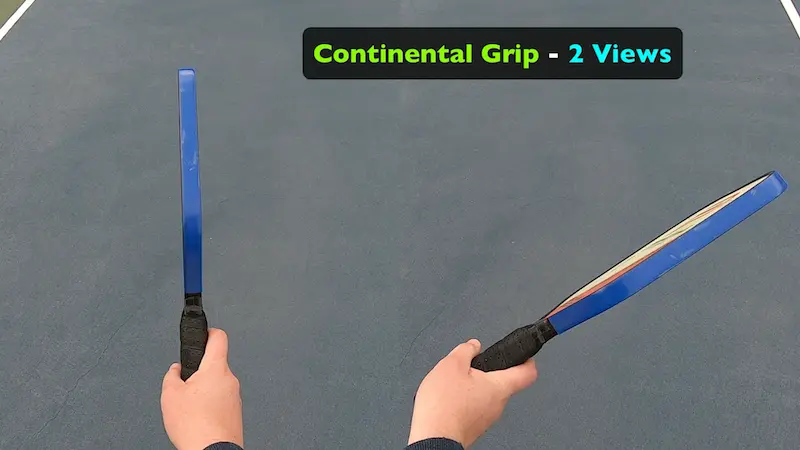
If you tend to prefer to be in an eastern forehand grip in your return ready position, then you’ll need to make a grip change to continental right as you start to turn for the shot. (To see live example of grip change see time marker 2:29 in the YouTube video at the top of the post)
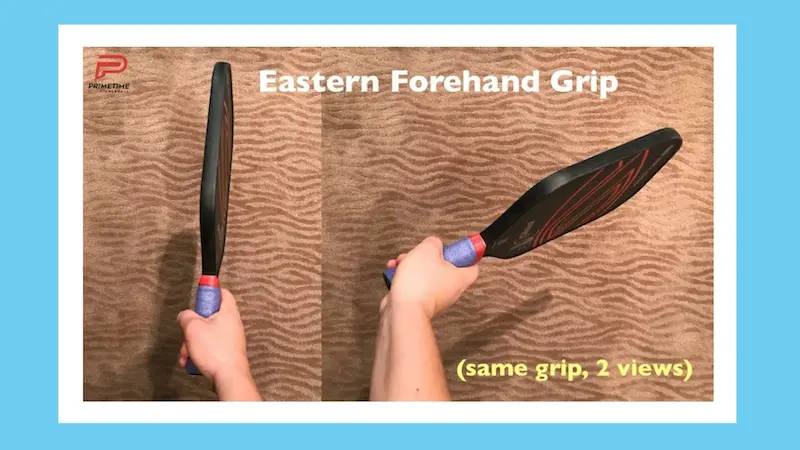
Use your non-dominant hand, which in my case is the left hand, to turn the paddle slightly and to set a continental grip for your right hand.
Many players, myself included, prefer to wait with a continental grip in our ready position when returning since we will often hit a slice return on both sides.
Should I choose to drive it likely means that the ball is slower and shorter, and I will have time to change my grip.
There’s no right or wrong answer here really for the grip you have in your ready position. You just have to know how you’re going to adjust based on what serve you get.
Your non-dominant hand should be resting on the throat of your paddle in the ready position.
It is common for the off-hand and the off-arm to be overlooked but they play a crucial role on the backhand not only for the grip change but also during the swing motion and we’ll cover that in an upcoming section.
Despite the lack of attention placed on the non-dominant hand and arm they have a significant responsibility at every stage of the stroke.
Throughout the swing we will continuously revisit the actions of the non-dominant arm and its important role.
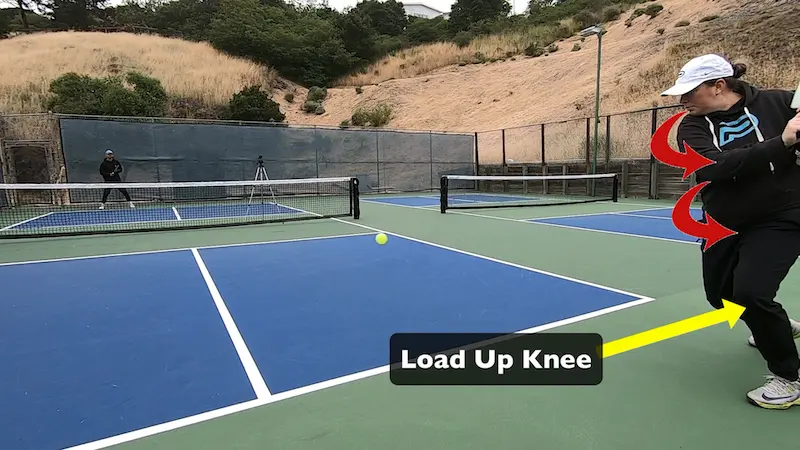
Step #3 – Good Spacing
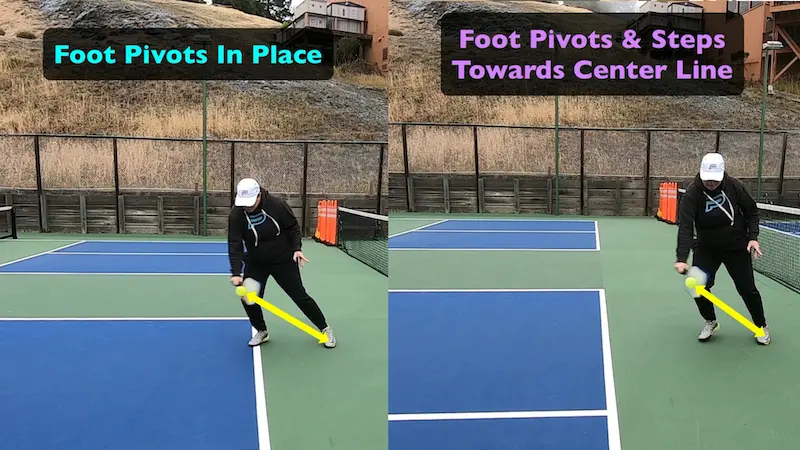
When the ball is headed to me my foot pivots first and then moves into the position I want to create good spacing with the ball by the time it gets into my strike zone.
Your strike zone is the ideal range in which you want to make contact with the ball.
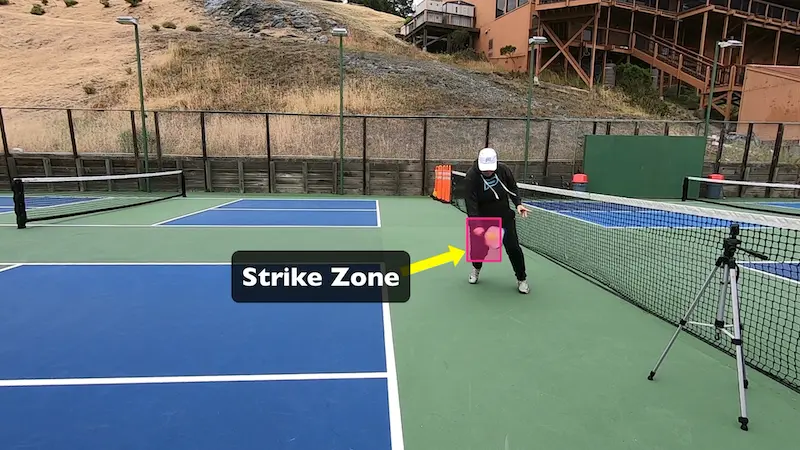
In the scenario depicted in the above image, I slide to my left, towards the center line, since the ball is headed somewhat away from me over in that direction.
I do this so that I can get more behind the ball and so the ball comes into my strike zone.
If the ball is coming more towards me, then I will simply pivot my left foot in place.
Moving towards your left if you’re a righty is generally the move you will be making for this shot.
Players tend to prefer their forehand so anything coming in their general direction, meaning into their body, will usually be handled with their forehand.
They will often even go as far as to run around a shot that is coming slightly toward their left side to take it with their forehand.
If you want to learn how to hit a great forehand slice return, then please watch this video.
As far as positioning your back foot, mainly note, that in all cases, by the time I am striking the ball the spacing between my back foot and my contact point is very similar.
This is key and we’re going to dig into that a bit more.
Creating a stable and repeatable stroke is essential for achieving consistency of execution on your shots.
Also, the more your shot feels similar from one shot to another, which can only be achieved if it is in fact quite similar, the more control you will have over the outcome of your shot.
While there is an acceptable range of difference since each incoming ball is slightly different, your objective should be to maintain as much similarity as you can on each shot.
This often overlooked aspect of maintaining consistent spacing actually plays a vital role in executing repeatable and accurate shots.
It is one of the less obvious factors that high-level players get right time and time again which significantly contributes to their exceptional shot making ability.
Look at how much distance there is between me and the ball at this stage of the shot. The ball has not even bounced yet, but I have already determined the best placement of my foot. (see image below)
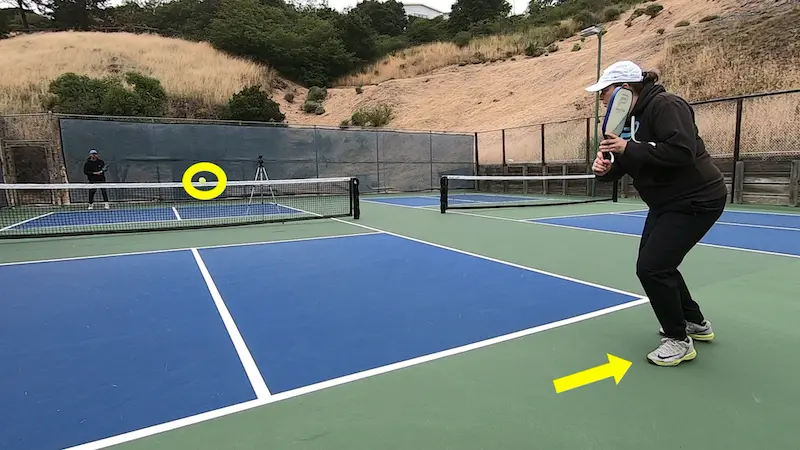
By the time I make contact I have established comfortable and appropriate spacing from the ball allowing room for a weight transfer all while ensuring I still make contact out in front.
This ability is a vital yet elusive to so many players.
Most aren’t even aware of how critically important this is.
The skill of proper spacing can realistically only be acquired through dedicated training and repetitive exposure to shots with varying speeds, heights, depths, and spins.
Over time you will develop an understanding and a feel for how to read each shot and then position yourself accordingly to have optimal spacing.
It is wise to give yourself more space than you might initially think, and this is not to say to wait for the ball too long, but most players allow the ball to come too close leaving no room to step in and still make contact in front while maintaining a relaxed motion and allowing for a freely swinging arm through the shot.
You still want to get your feet moving to the ball, but you want to time your swing correctly.
You may need to start your swing a little sooner than you have been to take advantage of an appropriate amount of spacing that will allow you to strike a more free flowing shot which is ultimately a better way to do it.
Achieving the correct spacing sets the stage for the subsequent components of your stroke to flow smoothly.
During the backhand slice, as you pivot and position your back leg, it leads you to our next point.
Step #4 – Load & Turn
First you will bend your knee to load up your back leg while simultaneously turning and coiling your hips and your shoulders.
You’ll really want to get that hitting side shoulder well turned.
A lot of people don’t get to a big enough turn at this portion so really get those shoulders well turned to the point where your shoulder is basically right up against your chin, both hands go back together and your elbow is slightly bent.
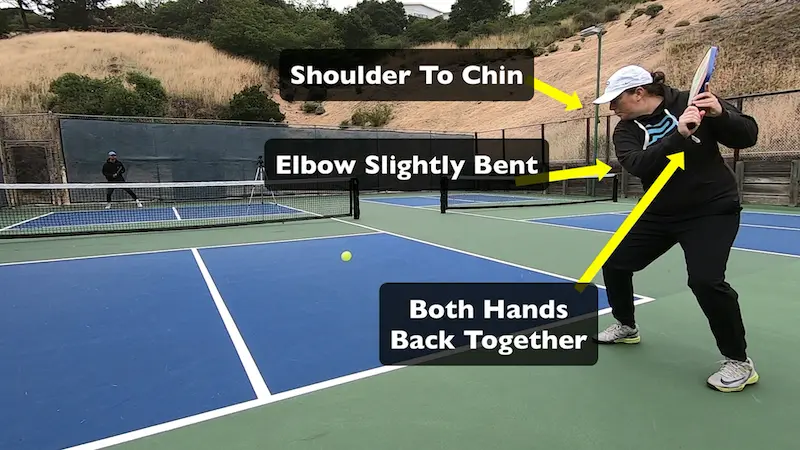
You’ll extend your arm a little a bit later as you start to swing forward.
But, in this back part of the motion your paddle is resting gently in your non-dominant hand which is still at the throat of the paddle at this point of the stroke.
Since this is a slice return and your aim is to create some time as you move towards the non-volley zone line, you won’t need to hit the ball with maximum speed. In fact, you won’t want to.
Consequently, your hip and your shoulder coil won’t need to be as fully pronounced as when you’re executing a powerful ground stroke like a driving ground stroke that you really want to strike.
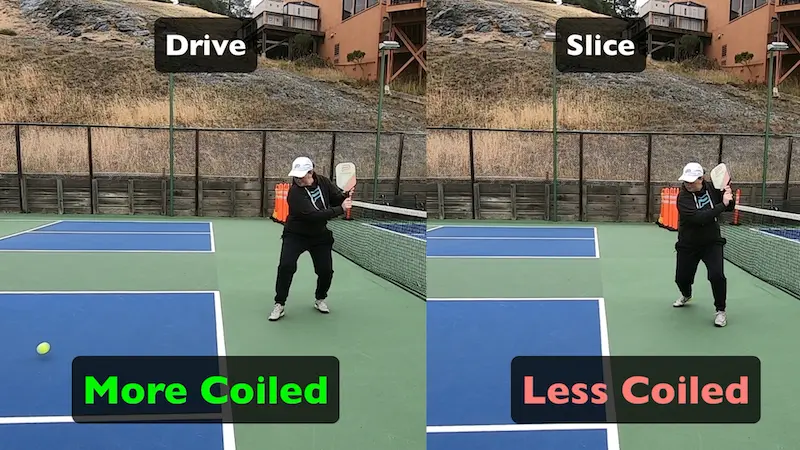
However, you still want to utilize your body in the shot and there will still be some rotation in your hips.
You’ll step into the shot pretty directly forward which is generally referred to as a neutral stance shot.
Don’t bring the paddle back too high on the turn back.
You’ll want it roughly at shoulder height.
If you bring it back too high, you risk doing like a chopping down type motion instead of swinging through and this tends to lead to undesirable effects for your shot and creates unwanted problems.
Since the incoming shot already possesses considerable speed and you’ll be moving into the shot it becomes more of a send back rather than a forceful strike back on this type of shot.
Step #5 – Leand & Counterbalance
As I mentioned a little bit earlier there is still a drive forward from the hip on this shot, but it is not as pronounced as on other driving ground strokes.
This is because the shot is more reliant on a substantial lean into the shot and a weight transfer from the back leg to the front leg.
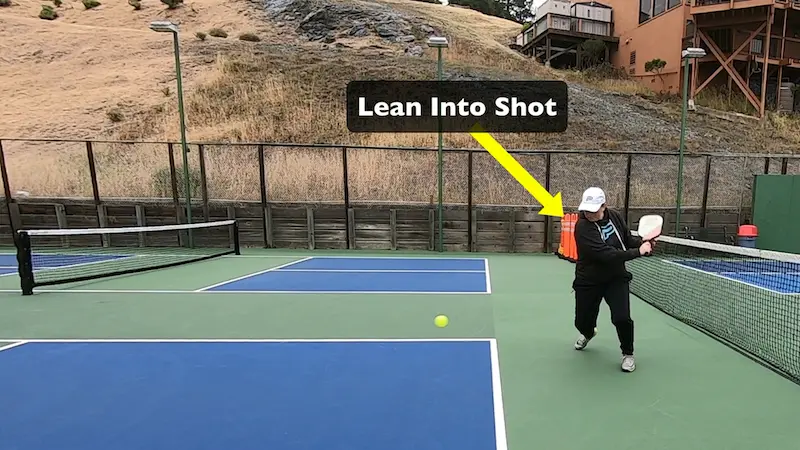
On the backhand slice you get a lot of help from gravity as your shoulder swings on that downward trajectory.
So, although do you do get a little push from the hip initially, the momentum of your arm coming down from that and the assistance from gravity provides most of the energy to get through that swing more so than on any other ground stroke shot.
You send your non-dominant arm slightly back to act as a counterbalance to your swing and will help to keep you stable and sideways and helps to decelerate your motion after contact.
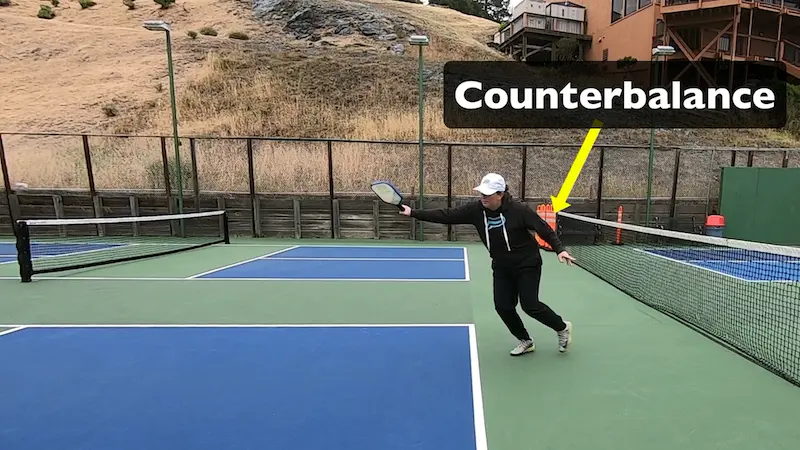
All this combined together is what sends your swing forward and downwards towards your impact point with the ball.
Step #6 – Critical Actions At Contact
There’s a lot of important things happening at contact.
You still want to be meeting that shot out in front of your body and note that the paddle face is only slightly open and relatively level with your hand at the time of contact.
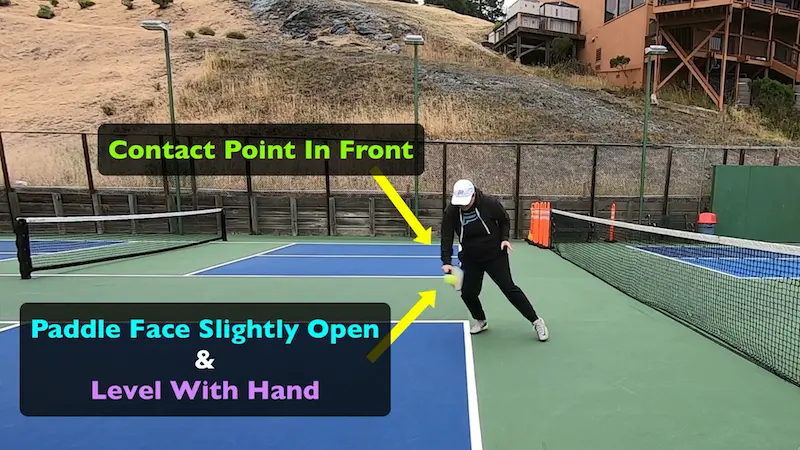
It’s a common misconception among players learning the slice that the paddle face needs to be significantly more open. That’s not true because this will lead to the undesirable effect of the ball going higher than you would like.
If your aim is to predominantly still send the ball in a mostly forward directory with backspin and with somewhat of an arc to help give you that more time to get to the non-volley zone line as we discussed, then the paddle face should not be excessively open at contact. Only to a certain degree.
This is a lot less than most people realize.
So again, it should only be slightly open.
To achieve the underspin rotation on the ball, imagine that the ball is an orange.
The exterior of the orange as we know has a peel, so you want to be thinking I’m going to strip the peel of the orange off with my paddle face.
So, while your paddle still needs to make substantial contact with the ball, the power line or energy line of your stroke isn’t going directly through the center of the ball as it would be in a pure drive flat shot type situation.
The paddle face does need to have enough contact with the ball to send it where you want it to go which is over to your opponent’s side of the court while at the same time having enough friction with the paddle face to impart the spin.
So, you’re still grabbing the ball quite a bit, but it is more of a grab of the exterior of the ball rather than a pure strike through.
Step #7 – Finishing Actions
From the start to finish of the swing your motion will form a u-shape.
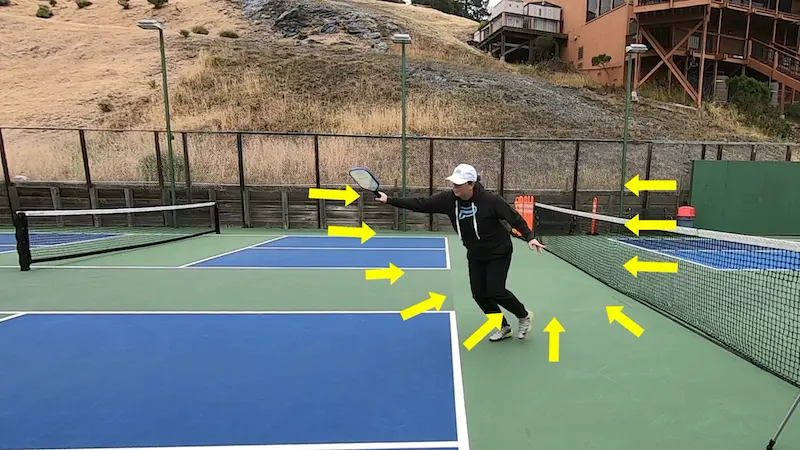
As mentioned, you start high at or near the shoulder.
You will extend well through contact and finish out in front and over towards your dominant side.
It’s very important to follow through.
Let your arm swing well through contact and have an extended finish. Your arm should be straightening out through the shot and should be very straight by the end of the shot.
Emphasis on the word “let”.
You must allow your arm to swing freely, and you can’t force your way through it.
As we touched on before, the slice return is executed with a medium pace swing and you get quite a lot of help from gravity as well as the speed that already exists on the incoming ball.
Let the counterbalancing non-dominant arm that you’ve sent backward help you decelerate that swing.
Your head should be down throughout the shot.
That really helps to keep your shot stable and to keep you balanced throughout the shot.
As you bring your back leg through and forward, you’ll be in excellent position, especially after a big lean like that, to continue advancing up to the non-volley zone line after your slice backhand return is complete, all while maintaining dynamic balance throughout the shot.
Conclusion
In this blog we covered the mechanics of a backhand slice return however if you are interested in better understanding why a slice specifically is an excellent choice on a return, often over a power drive or a topspin return, we have a comprehensive video dedicated to explaining just that concept.
Are you using a slice backhand return? If so, is it as good as you want it to be?
We’d love to hear about your experience with the backhand slice return in the comments of our YouTube video at the top of this blog post.