In today’s video/blog we’re going to talk about attacking and transitioning from the baseline to the non-volley zone.
As you can see, I’m in my traffic light outfit here as first shown on a previous video about attaching from the net.
If you haven’t seen our previous video go check that out.
In that video I was talking about the visual of a traffic light and we’re going to use that same visual today.
We’re going to talk about the red zone from my knees to my feet, the yellow zone from my knees (approximately) to my waist, or my navel area, and the green zone from my navel, or waist area, and up past my head.
I think this is going to be a really good visual for you as we talk about transitioning from the baseline to the non-volley zone.
Now let’s jump right in…
Let’s quickly set the stage here with the scenario..
We’re talking about the serving team, after you and your partner have served, and your opponents have returned the ball. You are at the baseline hitting your third shot. After you or your partner hit that third shot what do you do and how do you make it up to that non-volley zone?
That’s what we’re going to talk about in this video/blog today.
I think it’s going to be helpful to kind of explain what I’m thinking after I hit my third shot drop. After I hit my third shot drop, I try my best to assess the quality of the shot.
Opponent’s Red Zone At NVZ Line
If it’s hit into the red zone, which means they have a contact below knee level, I will come in as quick as I can and try to get up to that non-volley zone. But, if I can’t, I’ll stop and split step so that I can be ready for the next ball.
So right after a good third shot that forces my opponent to contact in the red zone, I’m going to come up as far as I can, split step and try to control that ball and hit a neutral ball and then make my way to the non-volley zone.
Opponent’s Yellow Zone At NVZ Line
Now if their contact point is in the yellow zone, I’ll be very cautious and I may take a few steps in taking into consideration their attacking ability and my ability to hit a neutral shot into the kitchen if I have to.
Opponent’s Green Zone At NVZ Line
If their contact point is in the green zone I’ll stay all the way back behind the baseline to defend a very offensive ball.
Summary of Opponent’s Zones
Hopefully these little tips will help you notice that the decision of me coming up or staying back really hinges on the quality of that third shot drop.
The best thing that you can do is get out there and drill these third shot drops so that you can be quicker at assessing their quality.
Now let’s get more in depth of what I’m thinking when I’m starting to make my transition to the non-volley zone.
Like I said, after I assess the quality of that drop, I’ll start to make my way up to the non-volley zone. One thing that is really important that I always make sure is that I am split stepping and I’m never getting caught in transition.
As you see here (in the video), as Katrina hits the ball to me, I’m never getting caught hitting the ball while I’m moving. I always stop and split step before I hit the ball.
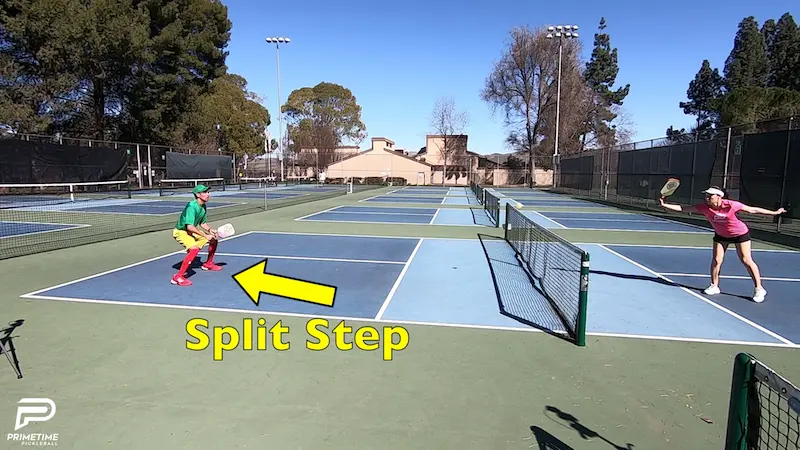
After my third shot I’ll try to cover as much ground as I can and then come to a split step to be prepared for the next ball.
This is key in transitioning. It is so difficult already to hit these balls in the transition zone so I want to do my best to be stopped so that I have complete control over my balance and my body.
Now as I’m making my way through the transition zone, I’m looking for balls to attack.
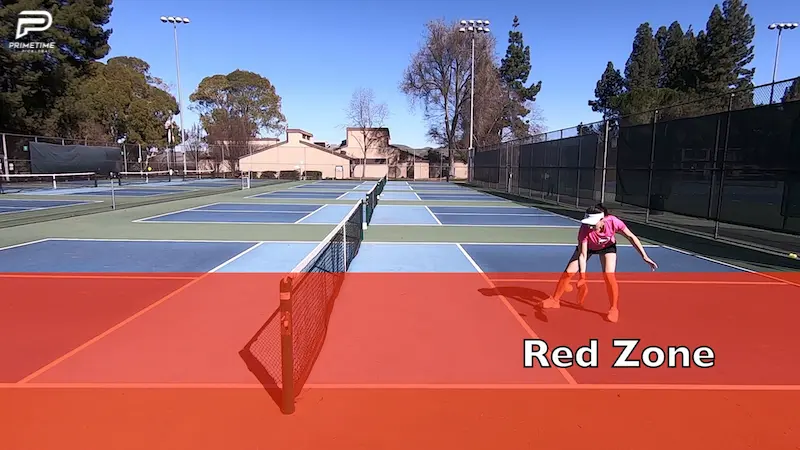
Let’s first talk about this red zone where the ball is hit below my knees.
My Red Zone In The Transition Area
Anytime you are transitioning and you get balls hit in this red zone, the best thing that you can do is to hit a neutral ball into the kitchen to prevent them from continuously attacking you.
Here’s an example of me attacking very low from the red zone and watch here as Katrina makes me pay for it (see video at top of post).
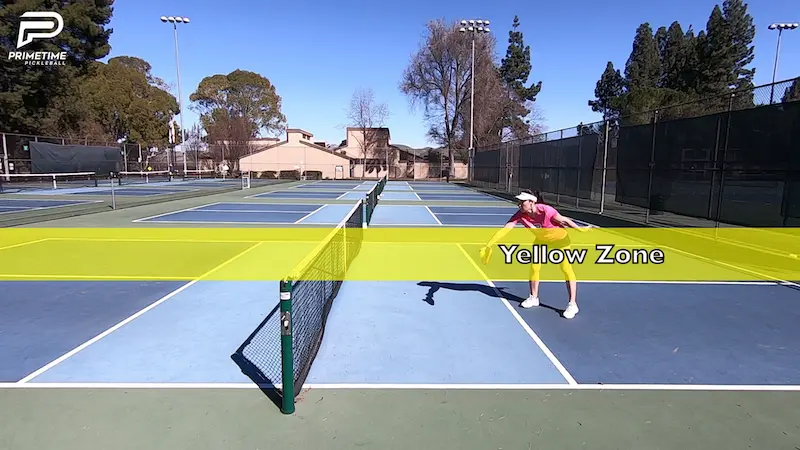
My Yellow Zone In The Transition Area
If I get balls in the yellow zone, this is when I really need to be picky on which balls to attack.
Remember, any time you are attacking from this yellow zone you are still attacking in a upward trajectory so this means that your opponent will have the chance to hit down.
So, if you choose to attack from this yellow zone you really want to be aware of the counter attacking and attacking skills of the net player.
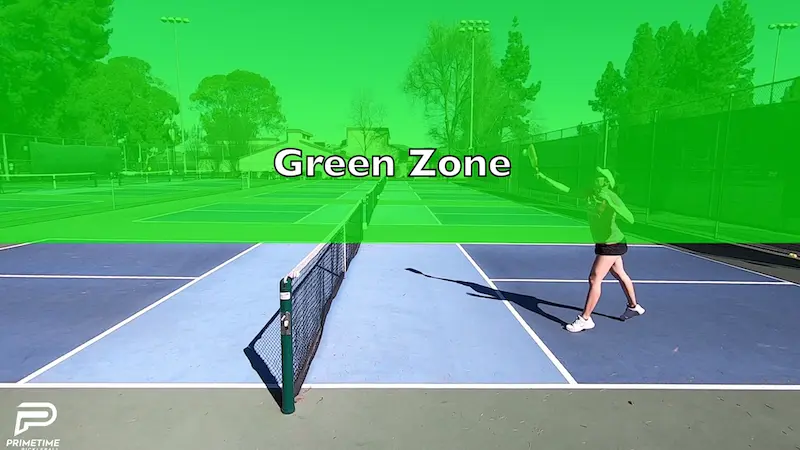
My Green Zone In The Transition Zone
Now, most likely after the third shot drop, the opponent at the net is going to try their best to keep their ball at my feet. But, if they leave that ball a little high and I could contact the ball from this green zone, I’m for sure going to attack that ball and make them pay.
Here’s a couple clips of my transition as I get some balls in my green zone and I attack it well (see video at top of post).
Conclusion
Hopefully this video was very helpful to you.
This is just a really good visual to get you thinking about attacking when you are making your way through the transition zone.
You really want to make sure that you’re hitting neutral balls especially when you get attacked below your knees.
Now when you get to this yellow zone, and you’re making contact around this yellow zone, those are balls that you can attack on but you really want to be cautious and you really want to be aware of the attacking and counter-attacking skills of your opponents at the net.
When you get a ball in this green zone and you can have a high contact and hit down on those are the balls.. those are the ones you want to attack and go for and be really aggressive on.
Hopefully this video is really helpful to you and we’ll see you in the next video!
Happy Pickeling!