In today’s video/blog we’re going to answer the age-old question.. should the forehand always take the middle?
*Note – Watching the video while reading the blog will be very helpful as a lot of the situations described in the blog are best understood with the visuals in the video*
Has the following ever happened to you?
You and your partner are right up at the non-volley zone and before you know it the ball whizzes by right between you and your partner.
I’ll be the first to admit that this has happened to me on several occasions.
Now to answer the question – should the forehand always take the middle?
I’ll start off by asking an even more important question and that is who’s in the best position to cover the middle ball? You or your partner?
Why is this question more important?
Let’s go back and watch this (see video at top of post) and break it down.
My dad and I playing against two good friends of ours, Drew and Jim.
We see Drew hit a nice deep slice return down the middle and you see me drive this third shot because I know Drew’s forehand slice stays very low and that it could be pretty difficult to hit a precise drop off of a well-hit slice.
I choose to hit my drive to Drew because he is still on his way up to the net and his partner Jim is already set in a good balance ready position at the non-volley zone line.
My drive is good enough to force Drew to hit a short volley that lands a bit past the non-volley zone line and you see me split step and get ready to hit my fifth shot into the non-volley zone.
You’ll see me really squeeze over to that center line to put more pressure on Jim and Drew.
Since this was a competitive game, Jim and Drew were typically trying to keep the ball away from me.
By me squeezing and shifting over more towards that center line it can do several things.
Number one, it allows me to take all the middle dinks and/or to create winning or put away shots through the middle.
Number two, it creates a very small target for them to hit to if they are trying to get it over to my partner.
And number three, it leaves a window open near my sideline to bait them to hitting it there, in which case it is exactly what I want, as I am trying to get more involved in the game.
After a series of unattackable dinks my dad tries to hit the ball through the middle.
We see Jim cover this ball with ease as it struck right towards his paddle.
Even though this drive was hit right to Jim, it was low enough to prevent him from counter-attacking this ball.
Next we see another series of unattackable dinks and here we see Jim’s backhand dink pull my dad towards his sideline.
Let’s look at where my dad is contacting this ball. From this angle it looks like he’s hitting the ball right above his sideline. So, in this scenario, who’s in the best position to cover the middle ball? Jim or Drew?
Shading
Before we answer that let’s talk about shading.
What is shading you ask?
Shading is moving or shifting your position as a team according to where the ball is in your opponent’s court to put yourself in the best position to defend your side of the court.

You will constantly see high-level players shade as the ball moves around the court.
Let’s watch a few clips together of different player’s shading. (See video at top of post)
As we just watched, in order to best defend your side of the court you must shade.
It all comes down to the possible shots available to your opponent and the trajectory that those shots will take from your opponent’s paddle to the bounce on your side of the court.
You’ll also want to factor in what their highest percentage shots are.
Let’s see what can happen when you don’t properly shade.
Let’s check out this point here (see video at top of post).
Here you see me hit a really deep serve which forces a very short return just beyond the non-volley zone. This allows me to really step in and attack this ball.
As this return is headed towards me I know that I’m in the driver’s seat of this rally and because of this I want to make sure that I keep my foot on the gas, so to speak, and attack the short ball with a third shot drive.
Let’s take a look at a few good options that I have as I strike this ball.
The first option that I have is to catch the returner in transition. Due to his short return you can see that he’s only made it up about halfway through the transition area so driving the ball somewhere at his feet is my first option.
Another option that I have is to drive it right at my opponent at the non-volley zone.
This player is the player that is closest to me which therefore has the least amount of reaction time.
The third option I have is to hit the drive down the line.
Before we proceed, which option do you think is best in this scenario?
Let’s take a look at which option I chose…
As we see here I chose to go down the line and thankfully my drive lands right on the line for a clean winner.
Why did I choose to go down the line?
Let’s take a look as I get into position to hit this third shot drive. Notice my opponent here at the non-volley zone. He is positioned slightly to the left of his side.
Now let’s quickly draw the possible trajectories that my driving shot could take.
The possible trajectory for a hard hit drive range from about here to here (see image below). The ends of these arrows signifies where the ball could bounce and hit the playing surface.
So knowing this – is the player at the non-volley zone in the best position to cover his part of the court? No. He has left a small window open near his sideline.
As I saw the small window open I took full advantage of it. Now, just to be clear I really wasn’t meaning to hit the sideline. Every time I hit any shot in pickleball I try to give myself an extra foot or two to give myself margin for error.
As you can see in the slow-mo footage here.. even if my shot would have landed a foot or two inside the court it still would have been a pretty tough shot for this net player as he should have been shifted and shaded over towards the sideline to cover this down the line shot.
Now let’s watch this next point which is almost identical to the first.
Here my partner and I are stacking and as this return comes back our way let’s look at the range of the possible trajectories that my partner shot could take.
My partner’s hard hit drive can be hit from about here to here (see image below).
So as my partner gets ready to hit this shot, are both players in the best position to cover the court?
Let’s watch and see what happens.
Here the net player gets the ball passed by him on his sideline again.
Why is this?
When we go back and freeze the frame at contact notice how he is slightly shifted and shaded over towards the center line. As we look at where my partner is striking the ball, you can see that he has a small window open down the line just like the previous point. He sees this opportunity and takes advantage of it.
We want to be clear that although the examples seen here show the selected shot as a down the line passing shot, this option of the three mention has the lowest margin for error and you have to consider carefully whether it is a smart shot for you.
We often see this shot being overused when it’s not really in a player’s wheelhouse to attempt hitting such a small target.
If you don’t have the skill to make this down the line passing shot 8 or more out of 10 times then the higher percentage options and best options most of the time and in order are: number one, at the feet of the transitioning player and number two, attempting to overpower the net player if you feel your power will defeat their reaction time.
A general rule of thumb when it comes to shading is to follow the ball.
This means that as the ball moves closer to a particular sideline on your opponent’s side of the court, you should shift over towards that sideline to put you and your partner in the best position to cover your side of the court.
Just as we see here, this net player is shifted away from the sideline that the ball is near and as this return comes cross court he doesn’t properly shade over towards the sideline and as a result leaves a small window open and loses the point.
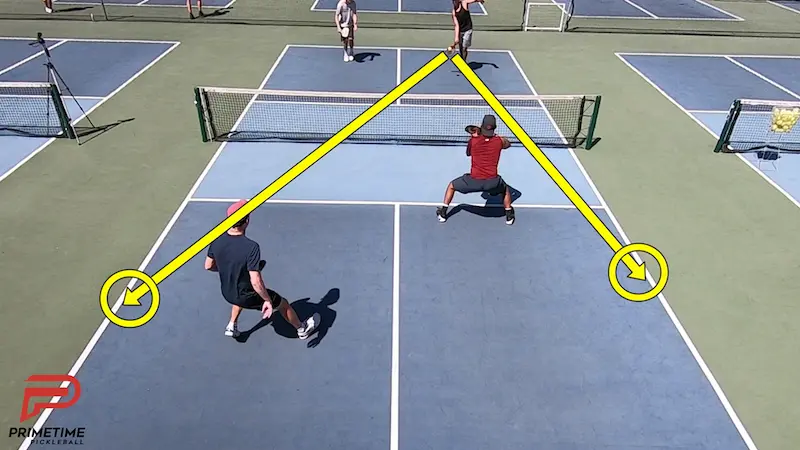
Now let’s go back and check out the point that we saw in the beginning of this video.
Here you see my dad and I make our way through the transition zone getting to a 2 up 2 up neutral formation. After that we see a series of dinks, an attack, and a reset and then another series of some good unattackable dinks.
Now we get to the point ending shot.
So, now that we know about shading, whose responsibility is it to cover this ball through the middle?
Well from where my dad is contacting the ball, which looks to be right on top of his sideline, let’s draw the range of possible trajectories that his driving shot could take.
From this position, he can reasonably hit a hard topspin drive anywhere from the end of this arrow, here, to the end of this arrow, here. (see image below)
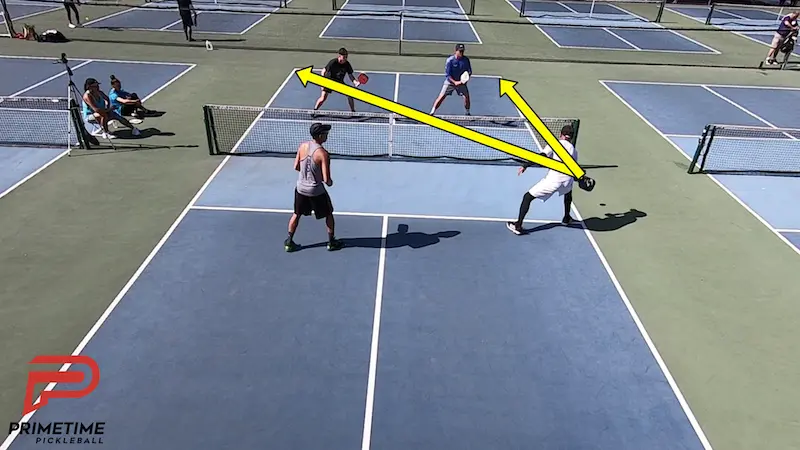
Knowing this, are our opponents in the best position possible to cover their side of the court? Are they correctly shading?
You guessed it. No, they’re not. Drew, the player in the blue, should be shifted a bit over to his left to cover the possible down the line shot.
As for Jim, the player in black, he should be shifted more over towards the center line. So, if you’ve already guessed that this should have been Jim’s ball – you’re correct.
If you didn’t already notice, Jim and Drew both have their forehands in the middle as Jim is a lefty.
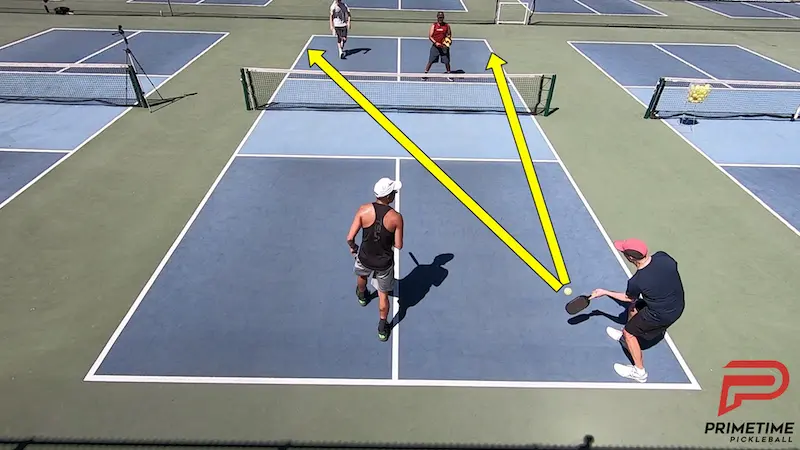
So to prove the point that the forehand shouldn’t always take the middle ball let’s watch the end of this next point which is nearly identical. (see video at top of post)
Here we see all four players have already made it up to the non-volley zone and you can see me here straddling the center line trying to apply pressure on my opponents and trying to get more involved in play.
The player in white hits a deep dink towards the middle of the non-volley zone which pushes me a bit back off the line.
Now as I’m still very close to the center line, I know that I have left this cross-court dink shot open.
For one, I know that I’m quick enough to cover this dink if it’s hit there and secondly, it’s actually the shot that I’m looking for as I’m always trying to find ways to create winning shots from my forehand side.
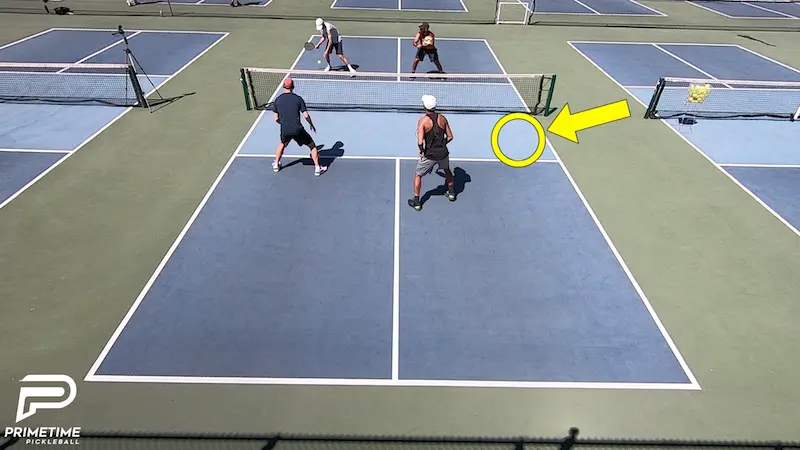
Next we see the player in white hit this cross court dink towards my sideline, just as I was expecting.
As I quickly get to this ball let’s look at the positioning of my opponents and let’s see how they shade. From this angle it looks like this dink forced me to contact the ball a bit outside my sideline. Notice how both my opponents shift over to their left as the ball moves towards my sideline.
Just like the previous scenario, I can either take this ball and attack it down the line or I can take it more through the middle of the court.
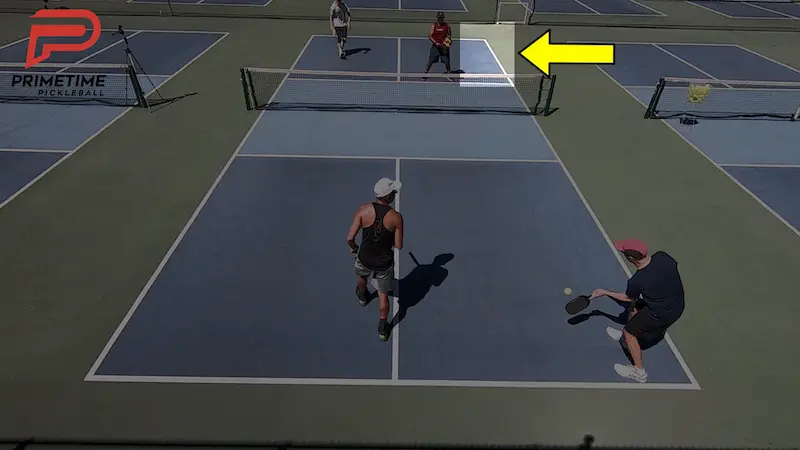
Let’s quickly take a look at the player directly in front of me. His shoulders and paddle are turned toward my contact point and it looks like his weight is leaning towards his sideline.
Also you can see that his paddle position is set in a backhand position.
For all these reasons, it looks to me that he has the down the line shot well covered and that he’s expecting it.
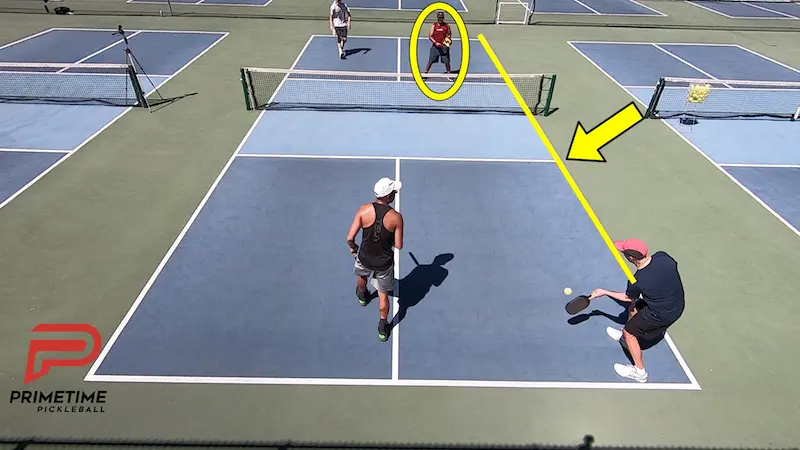
Now let’s look at the player in white. Even though he has shifted over a bit, his dink has pulled me very wide as I’m contacting the ball beyond the sideline.
So, in this case, for him to be in the best position to cover his part of the court, he should really be closer to the center line. You can see that the ball barely clips the end of his paddle and goes out of bounds.
If he had just shaded a step or two closer to that center line, he would have been in a much better position to hit and counter attack this ball.
So hopefully you see the importance of shading and how deciding on who should take the middle ball really depends on who’s in the best position to take it.
Sometimes players just make great shots and you aren’t going to be able to cover every single ball but you can definitely put you and your partner in the best position possible by correctly shading.
Drill
Now let’s show you a fun drill that you can do with a partner to practice on covering the middle ball especially in a neutral formation when all four players are up at the non-volley zone line.
Now that we know how to correctly shade, I’m going to show you a great drill that you can do with a partner. Just like we said, you should constantly be shifting over and following the ball as the ball moves around the court.
For this drill I have my wife Katrina with me. We’re both cross court from each other and we’re both on the eve side.
I’m going to start and feed the ball and we’re going to be dinking cross court.
What you can see behind me is I have a target of four cones there and we’re going to start off by dinking cross court and then when Katrina gets pulled off wide I have to be shaded over towards the middle to cover this middle ball.
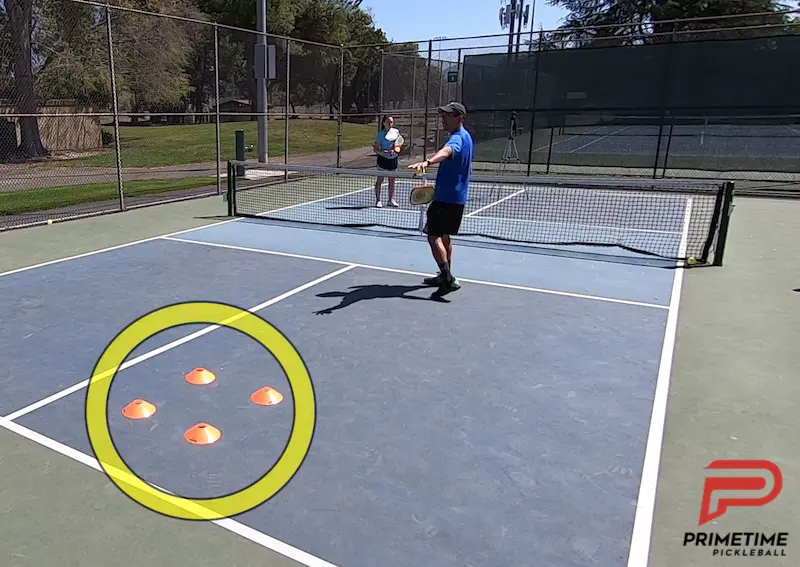
Because, if she’s contacting the ball from close the the sideline, partner should be covering the down the line. That leaves the middle vulnerable so it’s my responsibility to shade over and slide over and cover this middle ball.
We’re going to start dinking and then when she gets a wide ball she’s going to go for that target right there in the middle of the court.
I am going to do my best to cover that ball and try to volley that ball down at the feet.
This is a really good drill that you can do.
Hopefully this drill really helps you out.
Remember, you can also set this drill up on the odd side as well – you could dink odd side the odd side and move those cones to the other side of the court.
This drill will help you start anticipating those middle shots especially when your opponent gets pulled off the court and is contacting the ball close to the sidelines.
We really want to make sure that we slide over if we’re cross-court from that player and cover that middle ball.
Go out there and drill! Happy Pickeling!