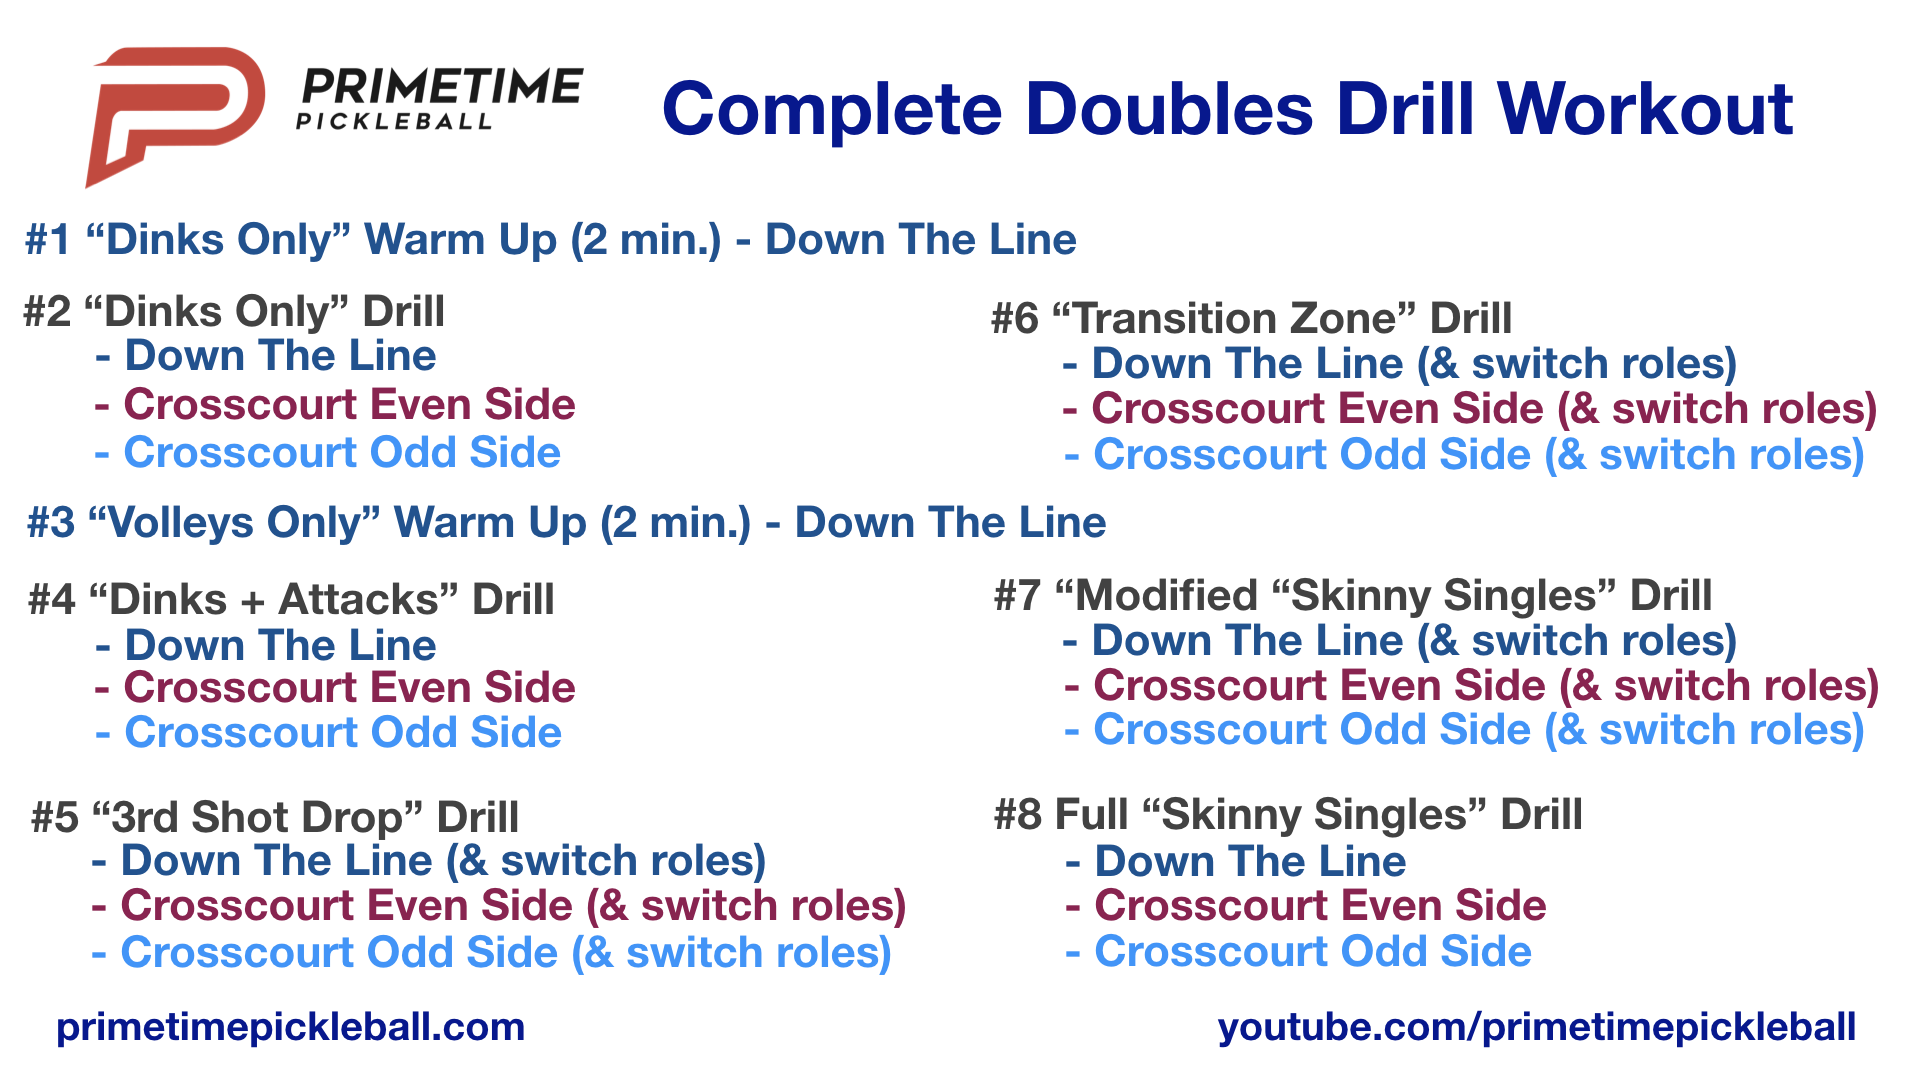
These are the top 9 pickleball skills you need specifically for doubles in order to be a force on the court:
#1 – Dinking and Dink Volleys.
#2 – Attacking from the non-volley zone line.
#3 – Resetting & Blocking from the non-volley zone line & mid-court.
#4 – Baseline Skills which include groundstrokes such as flat drives, topspin dipping drives and underspin (also referred to as slicing) and of course also dropping.
#5 – Transition Zone skills which include drop volleys, drop half volleys, driving volleys as well as driving, dropping and rolling approach groundstrokes.
#6 – Serving
#7 – Returning
#8 – Lobs
#9 – Overheads
We have developed a doubles skills mastery program that covers every one of these skills. Some of these game base drills cover one or two of these skills in depth while others cover many at once.
When running through our program every skill will be covered at least once and more often multiple times across several game base drills. Run through this workout once a week or more and you will see your game improve by leaps and bounds.
Dinks Only Warm Up
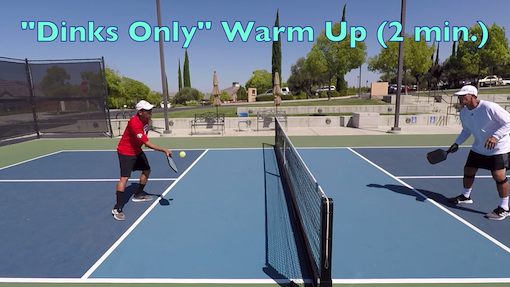 First up is the dink warm up. We’re going to do a 2 minute dinking only warm up
The dinking warm up before drilling is very important to get your body warmed up and loosened up in preparation for the drills to come. This is a critical part of pickleball. We see many players that don’t take enough of a warm up which can and does lead to injuries.
In fact, before this dinking warm up you should have already done a full body dynamic warm up without a paddle in hand. We have a great video about this which you can also find on our channel. We brought on our good friend, the Pickleball Doctor, Noe Sariban to show us how to do a quick and complete full body dynamic warm up.
Ok, back to the first drill. At first, you want to hit easy dinks mostly directly towards each other. As the warm up progresses, you can start to gently move each other around and even purposefully send your partner some higher dinks so that they can warm up and get a feel for their dink volley.
At this stage, you want to be very cooperative with each other. Key things to focus on during the warm up are to move your feet, be very intentional about moving to the ball well with excellent footwork, bending your knees and getting each contact point exactly where you want it.
A mistake we see often during warm ups is poor movement and a lack of intensity which goes against the point of the warm up. The point is to get your body ready and also to get a feel for your shots so take your warm up seriously and be purposeful with your movement. Avoid just going through the motions.
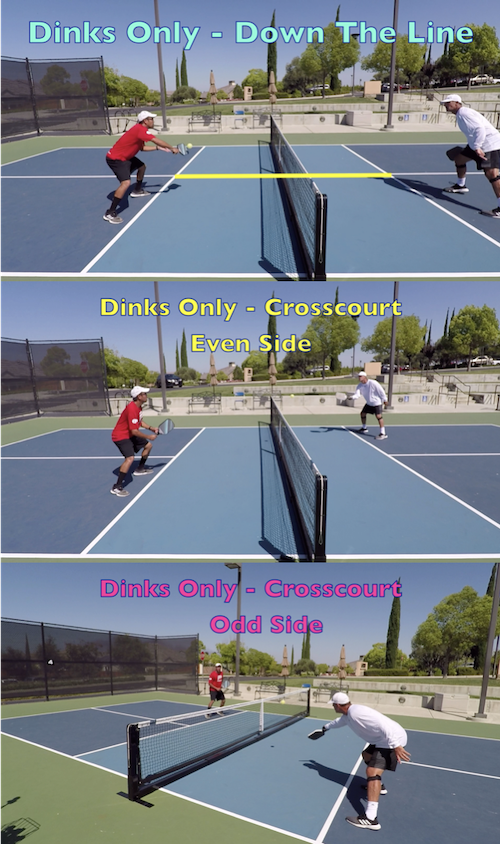
Dinks Only Drill
Down The Line, Crosscourt Even Side & Crosscourt Odd Side
 Now that our bodies are ready and activated thanks to the dink warm up, we’re ready to start training.
Our first training drill is the Dinks Only – Down The Line game to 5 points. You’ll want to keep score during your drills to be sure that you’re not only learning the skill but that you are also able to execute it under pressure when there is something on the line.
Both players will start up at the NVZ line. We are only going to use half of the court which is true for all of the drills in this series. For all these drills, there’s an imaginary boundary line through the kitchen down the center and beyond that imaginary line, the shot is out.
The boundary on the other side is, of course, the sideline but what is the depth boundary?
Well, there is no official depth boundary in this particular drill and this is because we encourage deep dinks as part of your overall dinking strategy. A few feet past the kitchen is acceptable as long as your shot is considered a dink even if it’s an aggressive dink (push dink).
You can and should hit some dinks a bit past the NVZ line to try and force a late contact from your opponent. It’s just smart dinking. In this drill, nothing can be hit hard, meaning that you can’t attack the ball, even if the ball is high.
The primary objective of this game based drill is to work on your dinks down the line. Both dinks off a bounce and dink volleys. This is a vital pickleball skill as a down the line dink is at times a strategically good option during a point.
Dinking down the line is a bit more difficult than dinking cross court because the net is higher towards the sidelines and an opponent down the line from you is closer than an opponent cross court from you due to simple geometry so you have less space to work with down the line than you do cross court due both to the net height, distance from your opponent and court surface area.
Once you’ve completed this game, you’ll move onto the next direction with the same rules. Next, we usually do dinks only on the even side going cross court, followed by dinks only on the odd side going cross court.
Just like in the down the line version that we started with. In these cross court versions of the dinks only drill, we are working on hitting unattackable dinks in combination with aggressive dinks. Patience and consistency is key. Don’t get sloppy and hit dinks too high just because you know they are not allowed to attack. This can easily happen in a dinks only type drill but don’t let yourself get away with this. It develops bad habits and you will pay the price for this sloppiness in drills to come.
Be focused and intense as well as purposeful in your decision making on what dink to hit next. Think about dink patterns and combinations of patterns you can use. What does this mean? Well, there are many different things you can do with your dinks to make things harder on your opponent and be unpredictable.
You can use different spins such as underpin or topspin, you can vary your dink depth by hitting deep or short, you can use lateral variety by hitting more towards the middle, more towards the sideline or even directly at them and targeting their feet. You can also use different speeds on all of the dinks we just mentioned. You can combine different dinks in different combinations to really make things tough on your opponent and generate errors from them.
That is the purpose of the dinks only set of drills. Dinks only is also a great workout since you are not able to attack, points can go on for a long time and this will improve your ability to stay in a point longer without getting tired. It will also teach you how to remain completive and focused while you’re breathing heavy and your legs are burning.
On the cross court versions of dinks only, we have a rule that on dinks hit very wide, you are allowed to hit an around the post shot. The player that successfully makes an ATP shot wins the point. This rule teaches you not to setup an ATP for your opponent. This rule is true for all cross court drills we do. It’s also valid for the down the line versions of all these drills even though it’s less likely to happen.
Volley Warm Up
Down The Line (Only)
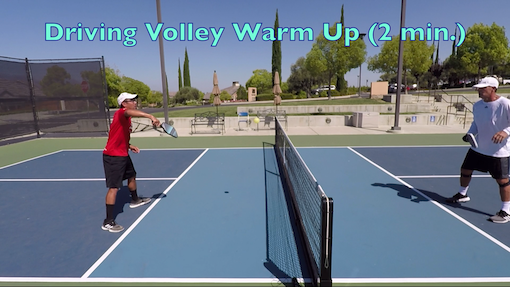 Next up is the 2 minute volley warm up which we will only do down the line. No scoring. Both players start up at the NVZ line. The purpose is to get a feel for our driving volleys. Be sure to warm up both forehands volleys and backhand volleys.
Hit through the ball and get your volley all the way to the other player at waist or higher level. Have more of a level trajectory with your swing path. Do not go high to low because you will end up hitting it at their legs or feet and that is not helpful for them to warm up their driving volleys.
Start slow and then speed it up. Be mindful of the speed you and your partner can handle. If you see that they are not able to keep up with the speed then slow it down a bit. You want a continuous rally. This is a cooperative exercise. We are essentially warming up a skill that we will need in the next set of drills because as of now, we have only been dinking.
Hit it mostly to them and as the warm up progresses move it around a bit but only in such a way that it’s still well within reach for them. Only hit it as far as they can comfortably reach it with an extended arm, no further. They shouldn’t have to be bending or lunging to reach the shot. You are not trying to hit it by them or make them move substantially. You are just trying to help them hit their full range of volleys and they are doing the same for you.
Dink & Attacks Drill
Down The Line, Crosscourt Even Side & Crosscourt Odd Side
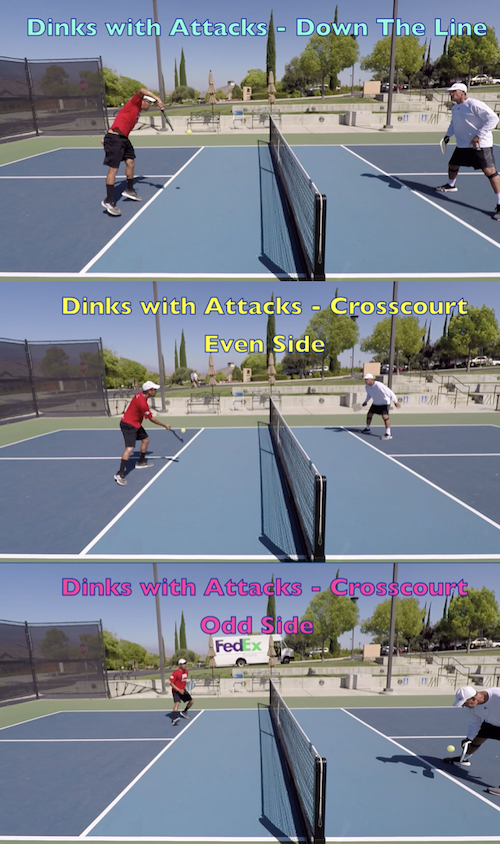 Next up is Dinks with Attacks.
Unlike in the dinks only drill where there’s no clearly defined deep boundary but you are not permitted to hit back into mid court or beyond, the whole half of the court is in for this drill. You are allowed to attack and hit hard. Basically, anything goes now.
Just like in ‘dinks only”, both players will start up at the NVZ line and we start with the down the line direction. Again, we score first to 5 points in each direction. The purpose of this drill is to learn how to finish with an attack once you’ve setup up an attackable shot using your dink.
Remember how I said to be very mindful of not getting sloppy with high dinks in the dinks only drill. This is why! If you were sloppy during that drill then you are going to pay the price now.
The key thing to focus on in this drill is to always, always, always be ready for a drive because it could come at anytime. Did I say “always” lol.
Your opponent may speed up a low ball that they probably shouldn’t because you can hit down on it but it will come fast and if you’re not ready, you may get burned. A bad speed up by them could still beat you. Also, players are getting better and better at attacking from balls that are not even net high and using topspin to keep it in.
And of course, you might hit a high dink by accident in which case you definitely need to be ready. So…BE READY for a drive and be sure to cover the possibility of a drive first. You will have plenty of time to deal with a dink should that be what comes.
Once you’re done with the down the line direction, you do the same thing using the even side and finally you both move to the odd side.
You’ll probably notice that down the line is the hardest because there’s less angles available to you to move your opponent around and setup your attack. Also, they are closer to you so attacks are on top of you faster and it’ harder to keep your dinks low and unattackable. The same is true for them.
If you can master this drill down the line then the cross court variations should seem easier to you. However, if you have one side weaker than the other. For example, let’s say your backhand is weaker than your forehand, then your opponent will have an easier time finding your weakness in the crosscourt variations of this drill.
Do not avoid your weaknesses when doing these drills. Work your weakness even if it’s at the expense of losing the drill. That’s the whole point of drilling, to shore up your game. Don’t win the battle just to lose the war.
3rd Shot Drop Drill
Down The Line, Crosscourt Even Side & Crosscourt Odd Side (& Switch Positions For Each Direction)
Next up is 3rd shot drops. One player starts at the baseline and one player starts at the NVZ line. The player that starts up at the NVZ line must hit everything deep for the entire drill. They can not hit drop shots or short shots. The back player cannot come up to the net. They must stay back and attempt to win the point from there even though it will be tough.
Because each player has a different role in this drill, you will play it twice in each direction so that each player can have the opportunity to play each role. We will start with the down the line direction followed by the even side and finally the odd side. Remember, you’re doing each direction twice so you will play a game to 5 six times for this set of drills.
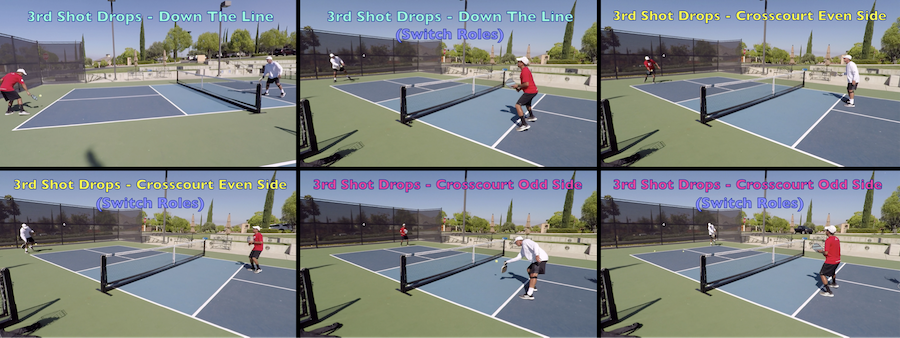
The back player is practicing their drops and the up player is practicing closing out the point and keeping everything deep. We tend to refer to this as the 3rd shot drop drop drill but it’s really just a drop drill. As pickleball is evolving, you often have to hit multiple drops beyond the 3rd shot drop in order to earn yourself the chance to advance to the NVZ line. You have to “win the line” so to speak and this drill will help you to hone that skill.
You can also drive it if you are not in good position to hit a drop. You are always seeking to hit a drop but sometimes it’s just not wise if you are not well setup or if they hit a really good shot that you are hustling just to get to.
In a real game you would be advancing to the net following a good drop but in this drill you will stay back regardless of the quality of your drop.
We still tend to score this game to 5, however, the back person is at a significant disadvantage so don’t be surprised if the back person is almost always losing this game when two players are of equal skill. The player at the line has “the high ground”, so to speak, and they are in a more advantageous position from which to win the point because they can be attacking and the back person is neutralizing and defending.
As the back player, if you are staying in the point and the points are very long then that is excellent even if you ultimately end up losing the point. That is to be expected. Of course, the goal is to win but it’s important to understand that you’re at a significant disadvantage from the start so if you are making long points out of it then that is a win even if you don’t ultimately end up winning on the score board.
Transition Zone (No Man’s Land) Drill
Down The Line, Crosscourt Even Side & Crosscourt Odd Side (& Switch Positions For Each Direction)
Next up is the transition zone drill. One player starts at mid court and one player starts at the NVZ line. Just like in the 3rd shot drop drill, because each player has a different role in this drill then you will play it twice in each direction so that each player can have the opportunity to play each role.
We will start with the down the line direction followed by the even side and finally the odd side. Remember, you’re doing each direction twice so you will play a game to 5 points six times for this drill.
The up player is targeting the back player’s feet and really trying to hit them in the shoelaces or slightly to the left or right of that for the most part but they can try to put it away if they choose. The back player is trying to drop it into the kitchen and neutralize the point.
The back player is working on their defensive skills. If they get a high ball they can hit an attacking shot but they are not permitted to advance to the kitchen after any shot. They must simply continue to dig and grind and get these balls back in play and keep them as unattackable as possible.
Just like the drop drill immediately preceding this, the back player is at a significant disadvantage and your goal is to keep these points going for as long as you possibly can. Of course, go for the scoreboard win but it is an uphill battle against an evenly matched opponent. Remember, it’s about developing the skill not winning the score board. Do your absolute best and don’t be discouraged if you often find yourself on the losing end of this drill as the back player.
Now, the transition zone gets a bad rap because we also tend to interchangeably call it No Man’s Land. Players get the impression that you should never be in this area and that just isn’t true. It’s true that you don’t want to be here for long but good players know how to successfully navigate this area and aren’t afraid to hit a shot, or a few, from here as they work their way up to the net.
Whether you are working to get up to the net from the baseline where you started the point or get pushed off the line and have to defend from here and try to hit a neutralizing shot to then use it to get back up to the NVZ line, you must get comfortable playing from this area of the court.
Being able to hit drop volleys and drop half volleys from this area is an important skill to learn and master. It’s definitely one of the tougher skills to develop but it’s also really fun when you learn how to hit shots from here and really frustrating for your opponents when they have you in this position and aren’t able to close out the point. If you’re 4.5+ then you definitely need to start getting comfortable in this admittedly uncomfortable area of the court.
Drill #1a Transition Zone DTL
3rd shots – One person up and on person half back to 5 points
Modified Skinny Singles Drill
Down The Line, Crosscourt Even Side & Crosscourt Odd Side (& Switch Positions For Each Direction)
Next up is the modified skinny singles drill. One player starts at the baseline and one player starts at the NVZ line. Just like in the 3rd shot drop and transition zone drills, because each player has a different role in this drill then you will play it twice in each direction so that each player can have the opportunity to play each role. We will start with the down the line direction followed by the even side and finally the odd side. Remember, you’re doing each direction twice so you will play a game to 5 points six times for this drill.
Before we get into the drill specifics, I’d like to point out that over the course of this particular drill in the video (at the top of this post) for this series, the wind began to pick up on Jordan and Danny so the points were not as long as you might normally expect due to the increasingly difficult conditions.
It’s important to note that practicing in adverse conditions such as higher winds and having the sun in your eyes is great practice. You will certainly come up against tough conditions during tournament or other competitive play. I have have personally learned to love playing in the wind though that was not always so. Since I have embraced it and learned to work with it instead of against it, that has given me a competitive advantage on windy days.
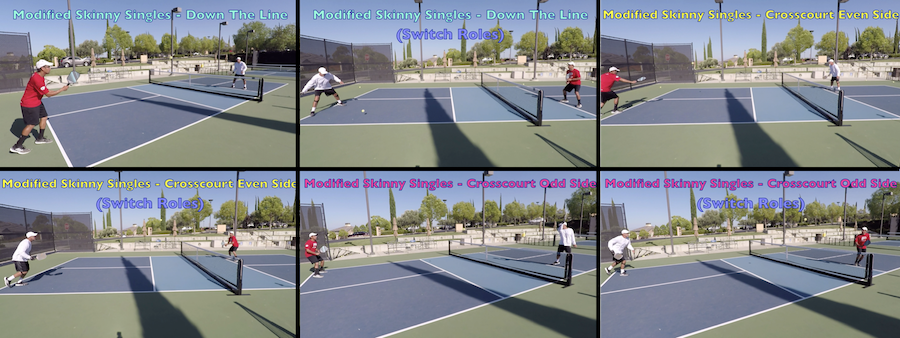
Ok, back to the drill specifics. The up player always feeds the ball to start the point in this drill and they feed it as deep as possible.
For the first time in this drill sequence, the baseline player is allowed and encouraged to come up to the net as soon as they can. To this end, they are attempting to come in behind a good drop but they are free to drive the ball if they choose.
This drill integrates the 3rd shot and Transition Zone drills we worked on previously along with the Dinks + attacks from earlier in the drill set. As you may be starting to see, as you go along in the series, our drills build upon the previous drills in terms of the skills you need to play a point, only in reverse. We start at the net and work our way back until we’ve covered every skill we need to play a full point.
Beginning with Modified Skinny Singles, we are now starting to work all the skills together to build a complete point. What this drill also does in addition to the skill of being able to execute transition shots is incorporate the decision making process on when to transition vs. when to stay back and keep defending.
The goal of the back player is to successfully defend, neutralize the point and eventually build an attack to finish the point once they have advanced to the net.
The up player’s goal is to capitalize on their current advantage and do their best to keep the back player back at the baseline and close out the point before that player is able to transition to net.
Just like the drop drill and transition zone drill, the back player is at a disadvantage to start but they now have a more reasonable chance at winning the point since they are allowed to come in and neutralize the up players court positioning advantage and build up to the chance to attack. This drill simulates what a serving team must do once a returning team has captured the net.
Full Skinny Singles Drill
Down The Line, Crosscourt Even Side & Crosscourt Odd Side
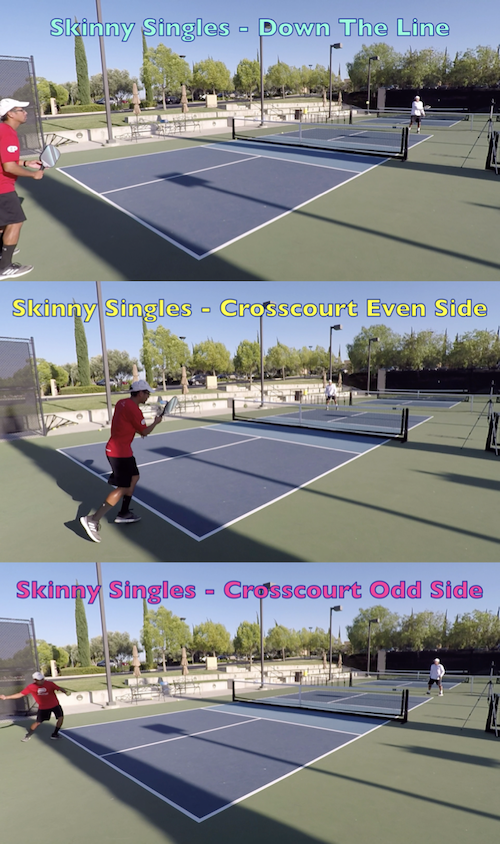 Next up is the Full Skinny Singles drill. Both players starts at the baseline. In Skinny Singles, we add in serves and returns and apply the full set of skills we’ve just drilled. In this drill, unlike the last few drills, we will play first to 5 points but only the server can score.
For this reason, we only need to play a game to 5 once in each direction since both players will get to play each role within a game. You can however play multiple games in each direction if you wish. We often do just that. As usual, we will start with the down the line direction followed by the even side and finally the odd side.
Skinny Singles is the closest we can get to simulating doubles play using 2 people. It’s an excellent way and the best way we’ve come across to combine all the skills needed in doubles, which we have also just drilled individually, and merge them into what most closely resembles a doubles pickleball point.
With this drill, you’ll really get a good sense of what areas still need more work based on where a point breaks down for you. If you rarely make it up to net, then certainly, you’re defensive and neutralizing skills need more work and you should revisit the drop drill and transition zone drill frequently in your drilling sessions and possibly spend extra time on those.
If you often get up to the net comfortably but are out gunned or out dinked when you get up there, than certainly your dinks and attacks from the NVZ line need work and you should spend extra time on the dinks only and dinks + attacks drills in your upcoming drilling sessions.
If you find you’re quite solid from all locations and with all the skills then that’s fantastic, you are probably a 5.0 player. However, the drilling doesn’t stop for you because the best way to keep a skill once you have it is to drill it so that you also get to keep it.
The bottom line is that the drilling never stops and it’s always easy to keep drilling fun when you make points out of it as we’ve shown here.
Conclusion
For an outline of our complete set of pickleball drills workout, click here so that you can print it out and bring it to the court with you.
We hope that you have found this workout helpful and that it makes its way into your regular pickleball routine. We know these drills are proven to work because we use them ourselves and have used them with our students to make big leaps in our own play and theirs as well.